How To Restring A Nylon String Guitar
Today is the 4th day in my 30 day guitar coaching challenge, and I'm going to tackle a very common topic: how to change the strings on a classical nylon string guitar.
Steel string acoustic guitar strings and electric guitar strings use what's called ball end strings. These ball ends catch on the bridge so you don't have to tie them. Nylon strings on the other hand don't have this ball end. That means you have to make a specific knot to tie them in place.
But don't worry, I've picked up a lot of tips and tricks over the years and I'm going to show them to you today. While it does take an additional step or two, you'll quickly see that changing strings on a classical guitar isn't as daunting as it sounds!
Changing Strings On A Classical Guitar
Before you start to change your strings you'll need a few tools:
- String winder
- Clippers
- Guitar tuner
- Polishing Cloth
- Guitar Polish
- New Strings!
The first thing to do is to loosen the strings on your guitar. The string winder will make this much easier. I recommend to pluck the string and then use the string winder. This will make sure you're winding the string the right way. When loosening the string it should go down in pitch. Once you loosen the string so there's no tension you can cut it.
Never clip a string that's under tension! This can cause the string to snap wildly and hit your face. It's also bad for your guitar to have a drastic change in tension.
After you've unwound and clipped all 6 strings, and remove them from your guitar, it's time to polish. This is an optional step, but highly recommended. Polishing your guitar removes oils, acids, and dirt that naturally builds up on your guitar. These can be damaging in the long run, so it's best to clean your guitar every time you change your strings.
Now you're ready to add the new strings.
Changing Plain (Unwound) Strings
When you buy a new pack of strings, you'll notice that some are wound (textured) and some are plain (like fishing line). The plain strings are your higher strings and the wound strings are your lower strings. Most packs of strings will tell you what string goes where (numbered 1-6 or will call out the string names).
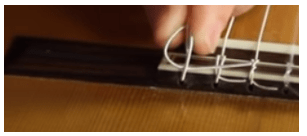
The goal of changing your strings is to make a knot at the bridge to hold the string in place at that side. Then wind it around the tuning machines on your headstock.
(Jump to 2:15 in the video to see what I'm going to describe here.)
Start by pulling the string through the bridge so you leave about 3-4" of string behind the bridge (facing away from your fretboard). Take that short end back over the bridge and wrap it around the long end of the string (like it just did a U-Turn around the string). I prefer to go counterclockwise. It should be facing away from your fretboard.
Next, thread the short end between the string and the bridge. On a plain string you should wrap it 2-3 times. Pull both ends gently until you have a nice knot.
Once you have a good knot at the bridge you can now wind the string around the tuner. Thread the string through the tuning machine and leave enough slack that you can wind the string at least 3 times around the tuning machine. This is where your string winder comes in handy!
You can bring the string close to pitch, but don't worry about fully tuning it until the rest of the strings are on.
Changing Wound Strings
The wound strings are strung basically the same way. The difference is you dont need to do as many loops in the knot or windings on the tuning machine. The winding of the strings catch on itself and holds it more securely in place.
When you tie the knot on the bridge pull about 2" of string through the bridge. Loop the short end around the long end in the same U-Turn fashion. For your knot you only need one or two (max) wraps to hold the string in place. Pull both ends until the knot is tight and secure.
When winding the strings, pull enough slack for about 2 windings.
Tuning, Stretching, And Clipping Excess String
Once you have all of the strings on it's a good idea to clip the excess string. Too much excess string can cause buzzing and it can poke you.
On the bridge you might not need to clip anything. Leave around 1/4"-1/2" of string. On the headstock you can clip it shorter, somewhere between 1/4"-3/8".
Now you can tune your guitar up. The strings will need to stretch out so they'll stay in tune. You can do this by tuning, playing for a couple minutes at a time, and tuning up again. You'll have to repeat this a few times until your strings don't lose tuning.
If you're not going to play your guitar right away you can tune up, leave it for a couple hours, and tune up again.
Lastly, you can manually stretch your strings. Here's how to do this:
- Place a finger on the 2nd fret of the low E string.
- With your other hand gently pull the string up and away from the body around the sound hold.
- Give it a couple gentle pulls and release.
- Tune your string back up and repeat until the pulling doesn't cause the string to go out of tune.
Repeat with the other strings. This takes an extra 5 minutes or so, but it gets your guitar to stay in tune quicker.
----
Thanks for joining me today. Changing strings can be frustrating the first few times you do them, so take your time and watch the video as many times as you need to.
I'll be releasing lessons daily during this 30 day challenge, so I hope to see you back tomorrow.
Do you have any tricks for changing strings that I didn't cover here? Let me know in the comments, I'd love to hear your ideas!
>> Check Out Day #5 : When Is It Time To Move On?