
Guitar Strumming Basics
Learning the guitar is an exciting and highly rewarding journey. Once you have the foundations down you can really go anywhere. One of those foundations is strumming and rhythm. It seems simple, right? You just strum the guitar.
But there are a few very important tips and techniques that will make you a better guitar player, quicker. We’re going to talk about those in this article. Even if you’ve been playing for a few months, there’s going to be something here you might not have seen before!
Before we dive into strumming, let’s talk about an overlooked aspect of playing guitar: how to properly hold a guitar pick.
How To Hold A Guitar Pick
Most (if not all) new guitar players struggle to hold a guitar pick. It’s one of the biggest challenges you’ll have early on. Holding a pick can feel awkward at first. And no matter who you are you’re going to drop it plenty of times!
Most of it just comes down to practice and repetition. But there are some tips that will set you up for success. Here are some great tips for holding a guitar pick:
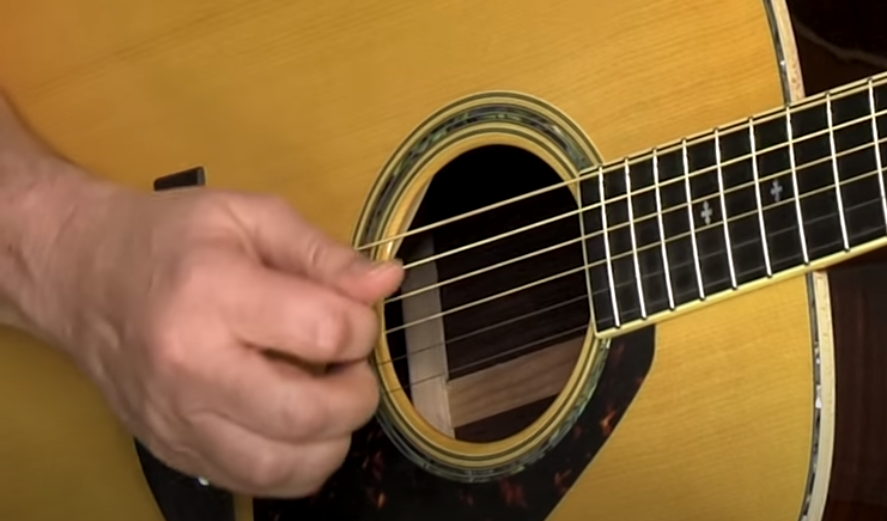
- Bend your index finger towards your palm. Then place the wide part of the pick on top.
- Place your thumb on top of the pick so you’re gently pinching it between your thumb and index finger. The tip of the pick should stick out.
- Your hand should look like you’re giving an “OK” sign. Adjust your index finger and thumb until you find the sweet spot for you.
- Make sure your pick still has some ‘wobble’. Pinch only hard enough to hold the pick in place.
- Strum your guitar and see how it feels.

This will look different from person to person. Some people feel more comfortable placing the pick above the first knuckle on the index finger. Some people feel more comfortable placing the pick in between knuckles.
The Pendulum Motion for Solid Rhythm
Before you learn new strumming patterns let’s talk about rhythm. When you strum your guitar it’s important to feel the rhythm. One way to do this is to have a pendulum motion with your strumming arm. If you watch a video of a guitar player strumming, you’ll notice that their arm or hand is in a constant up-down-up-down motion. Even if they don't strum on every beat.
This is what I call the pendulum. It’s an important technique to keep time and rhythm when you’re strumming. No matter what strumming pattern you’re playing, your arm is in a constant down-up-down-up motion.
Try this on your guitar. Mute your strings or make a chord and do the pendulum motion. Down-up-down-up at a constant rate. We’ll work on this more when we get into strumming patterns.
How To Read Strumming Patterns
Guitar players don’t generally read sheet music. But we do have a couple methods that tell us what to play: Tablature and Strum Diagrams.
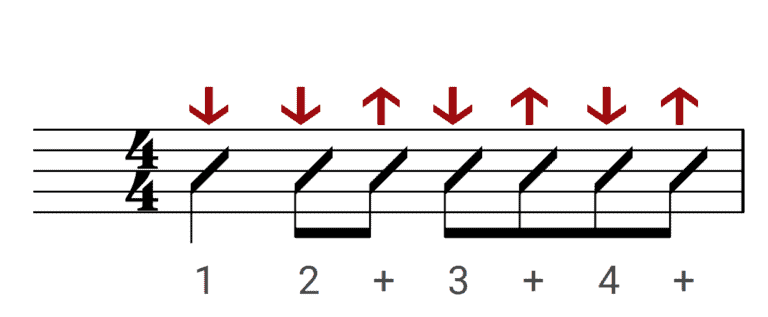
Let’s start with strum diagrams. These are a simple chart to show us the rhythm of a strum pattern. You’ll see arrows pointing down and up. When they point down you’ll play a down strum. And you guessed it, when they point up you’ll do an up strum.
Here’s an example:

The 1, 2, 3, and 4 are the down beats in a measure. The down beats are what you tap your foot to when you’re listening to a song. The “&”s are the up beats. We also refer to them as and’s. These are in between and are where you’d lift your foot if you’re tapping along to a song.
If you were to count out loud, it would sound like “ONE-and-TWO-and-THREE-and-FOUR-and”.
Looking at the chart above you can see that there is a down strum on every down beat. Only the and of 2 and 4 have up strums. If you were to count this pattern out loud it would sound like this:
ONE TWO-and-THREE FOUR-and
ONE TWO-and-THREE FOUR-and
If you want to know more about rhythm and time signatures, check out this video: Rhythm And Key Signatures for Guitar.
First (Most Important) Strumming Pattern
Let’s take all of the things we’ve learned so far and learn a very useful strumming pattern. I would actually say it’s the most important strumming pattern you can learn right now. Check out 0:56 in the video to hear it before moving on.
Follow along with this strum chart.
The strumming pattern is in 4/4 (four-four) time. The first 4 tells us how many beats are in the measure. The second 4 tells us what note subdivision gets the accent. Put way simpler, this means there are 4 beats in the measure and the quarter notes get the accent.
Quote highlight: Don’t worry too much about the second number for now, it gets a little more complicated. The first one will be more useful to identify.
Listen back to the strumming pattern and read the chart again. How would you say the strumming pattern?
If you said “ONE TWO-and-THREE-and-FOUR-and” you’d be right! An easier way to think about it is to strum every down and up beat, except the and of one.
Give it a try on your guitar. I find it helpful to speak the pattern before strumming it. That helps to get the rhythm in my head before I get my arms involved.
Strumming With Style
Your strums will naturally be inconsistent in velocity. This is a good thing! These inconsistencies add dynamics to your strumming. A quick way to do this is to strum the 1 beat harder than the rest. That doesn’t necessarily mean to dig into that strum as hard as you can. Instead, strum the ONE at a normal velocity and strum the “TWO-and-THREE-and-FOUR-and” a little softer.
Another way to add dynamics is to not strum all of the strings on every down and up strum. It sounds backwards but it’s true. There isn’t a set way to do this, but here’s a guideline:
- Play mostly low strings on the down strum
- Play mostly high strings on the up strum
Now put both of those together. In general it’s a good idea to make the strum on the ONE beat the biggest. So that should have a full strum. The rest can follow the low string-high strum dynamic.
Give it a try at a nice and slow tempo. How does it sound?
If it doesn’t sound perfect right away, don’t worry! These techniques take time. If you keep practicing these things will soon become natural and you won’t have to think about it.
Bass Note Strum Pattern
The bass note strum is a great way to spice up your strum pattern. Just as the name implies, it’s a strum that puts emphasis on the bass note of each chord. This technique is most often used in Country, Bluegrass, and Folk music.
It’s a really good idea to learn as many strum patterns as you can. They’re like tools in a toolbox. The more you have the more you can do. This one in particular is great because it also develops your picking accuracy.
Another helpful benefit is that it teaches you the bass note (or root note) of each chord. Knowing the root note of chords helps you memorize the fretboard and even a little music theory.
How To Play The Bass Note Strum
Let’s use the same 4/4 time we’ve been using. That’s 4 beats per measure. Go ahead and make a G chord and strum it 4 times; once per beat. Now instead of strumming the full chord on the 1st and 3rd beat, only play the bass note (3rd fret of the 6th string).
If you were counting the beats with the pattern, you’d go from:
ONE-TWO-THREE-FOUR
ONE-TWO-THREE-FOUR
To:
Bass Note-Strum-Bass Note-Strum
Bass Note-Strum-Bass Note-Strum
Skip to 0:44 in the video to hear what this sounds like.
You don’t have to use only downstrums with this pattern. You can add upstrums as well. Just make sure you keep playing the bass note on the 1 and 3 of the measure.
Guitar Strumming Tips
By now you’ve learned 80% of what you need to know to have smooth strumming. This next section is like the extra 20%. It will take your strumming from great to awesome.
Angle Your Pick
The goal of picking in any context is to have just enough friction to strike the string. Too much friction will slow you down. And too little will not strike the string enough for it to resonate.
When you’re strumming you want to “go with the flow”. That is to say:
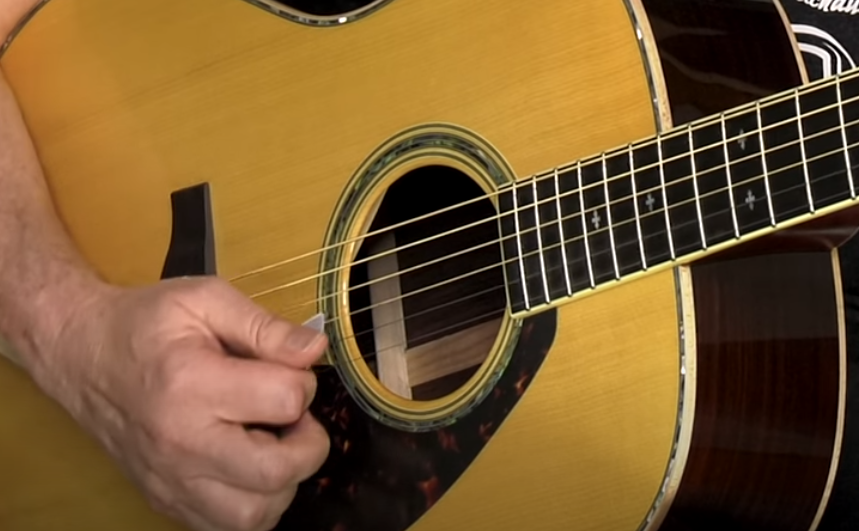
- Angle your pick down on downstrums
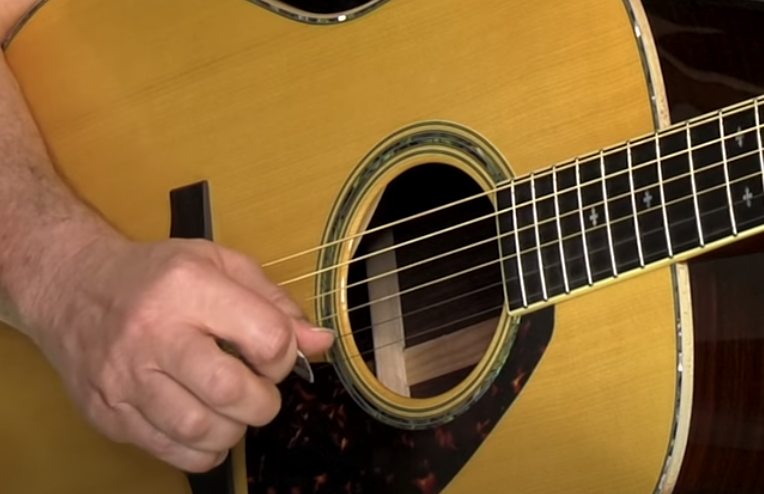
- Angle your pick up on upstrums
First, you want to make sure your hand is relatively parallel to the guitar strings. This looks different for everyone. The goal is to be able to strum all of the strings both up and down without having to reposition your hand.
From there as you strum down, let the pick drag a little so it’s angled down. Notice how the tip is pointing up towards my head.
On the upstrum do the opposite. Let the pick drag so the tip is facing the floor.
With both of these strums your wrist should be rotating to help angle the pick. You’ll need to find the right amount of angle for you, and the right pinch of the pick so it’s stable but wobbly.
Use A Thin Pick In The Beginning
Guitar picks come in all sorts of shapes and sizes. The materials they’re made of, and the thickness of each material, will all contribute to your overall guitar tone and feel. This is a lot of fun to experiment with. Especially because picks are pretty inexpensive.
I always tell my students to start with a thinner pick before moving on to thicker picks. I find that they’re a little easier to learn on. Especially when you’re working on getting the right pick angle and pressure. I recommend somewhere around a .70 size pick.
Don’t Hit All Of The Strings
I know what you’re thinking, but follow me here. When you hear a guitar player strumming through chords, they’re not hitting all of the strings on all of the strums. I touched on the subject of dynamics earlier and I want to look at that again.
Part of what gives music life is the imperfection and inconsistency. The inconsistency in strumming velocity. AND the inconsistency in the strings you play.
I’ll normally strike most or all of the strings on a downstrum. But on an upstrum I might only play 3 or 4 of the strings. Give that a shot. Do a simple down-up-down-up strumming pattern on an E chord, but only play the top 3 or 4 strings on your upstrum.
It’s a small and subtle technique, but it makes your strumming sound more natural.
How To Strum Without A Pick
I’ve put a lot of emphasis on pick techniques in this lesson. But it’s important to note that you don’t have to use a guitar pick. Guitarists like Mark Knopfler (Dire Straits) played rock music without a pick. And many modern Folk/Indie acoustic players strum away with their fingers.
I think there’s more value in learning bothe methods, rather than learning one or the other. So how do you strum without a guitar pick?
You have a few options.
Option #1 - Thumb Only Strum
The thumb only strum is a simple method that produces a mellow tone. This is really common in Folk style music. Start by keeping your hand relaxed; don't make a fist but don't tense your hand out.
As the name implies you’ll only play the strings with your thumb. On the downstrum you’ll play with the pad of your thumb. On the upstrum you’ll play with the outside edge of your thumb (not quite with the nail).
The strumming motion will mostly come from your thumb in a flicking motion. You should have a little bit of wrist motion in there as well.
Option #2 - Fingers Only Strum
In this strum you’re using both the nails and the pads of your fingers. Your thumb takes a break. The downstrums have a brighter attack that sounds more like a pick. That’s because you’re using your nails.
On the downstrum you’ll use a small strumming motion with your arm. But instead of striking the strings with a pick you’ll use the finger nails on your fingers. Think about it as going from a fist and extending your fingers out to strike the strings. While strumming downward very lightly. Most of the action should come from your hand.
The upstrum is the reverse of this. As you’re strumming up you’ll catch the strings with the pads of your fingers as you bring your fingers in to make a fist. Note that it’s a soft fist; you should be loose and not have any tension.
Option #3 - Thumb And Fingers Version 1
This is a combination of options 1 and 2. The downstrums will use the fingernails of your fingers. The upstrums use the fingernail of your thumb.
This method sounds the most like a pick because your fingernails are hitting the strings on every strum. Again for this method, the strums come from a combination of finger flicking, slight wrist rotation, and even sligher arm motion.
Option #4 - Thumb And Fingers Version 2
This last option is a little more complicated but is extremely useful once you learn it.
The first downstrum of the measure will use the pad of your thumb for the downstrum. The upstrums will use the pads of your fingers. And the downstrums after the first beat of the measure will use the nails of your fingers.
No matter which method you choose, make sure you’re not tensing anywhere. Your arm (and body) should be relaxed when you’re strumming. This will make sure your strumming sounds natural and dynamic.
If you enjoyed this lesson on How To Strum A Guitar then you’re a great candidate for my course Real Guitar Success. If you want to learn guitar in a fun, interactive way then check out the course today!