

Chords and strumming
The B major chord has given more of my students trouble than any other chord we work on, except maybe the infamous F chord. After a lot of tries and even more fails, students keep coming to me for help with it. So here are three ways to play the B chord, from easiest on up, so you can pick the form that works for you.
You don’t have to learn all three. If you only learn Form #1, that’s fine. I’d encourage you to use it for a while before moving on, unless you already play bar chords.
Do You Need the B Guitar Chord?
Fair question. In my first few years of playing I avoided any song with a B chord in it, and after a while I had quite a collection of songs I wanted to play but was avoiding. You won’t have to do that. Even as a brand-new beginner, you can learn to play any song with a B chord.
Why the B Major Chord Has a Bad Rap
The B major chord is one of a handful of common chords that doesn’t fit the “open chord” format. You can’t play the B (short for B major) with open strings the way you can the C, D, G and A.
There are many chords like that, and you can live without most of them, especially if you play folk-style guitar. The B, along with a few others like F, Bb and B minor, comes up often enough that you’ll want it. The good news: once you can play even one form of the B chord, the same principles apply to a whole set of other chords.
Did I Mention Practice?
Yes, practice is critical, but don’t stress. The main reason people don’t practice is that they don’t know what to practice, or in what order. That’s solved below, so you’ll know exactly what to practice. Five to ten minutes a day on the specific exercises here will get you the chords, and a new idea of what’s possible in your playing.
Are you ready? Let’s do this!
Three Forms of the B Guitar Chord
We’ll start with the easiest form and work up to the ones usually considered harder to finger. All three are useful. None is a throwaway you’ll stop using after learning a harder form; even when you can play the hardest form, there will be times when the less strenuous one is the best choice.
Go Barless
Start here
Who it’s for
If you’re a brand-new beginner, start with this one. It’s fairly easy on the fingers, it sounds good, and it needs no bar at all.
Advantages
- No bar, and no large stretches.
- Practicing it prepares your hand for other chords later.
- It fits most places a song needs a B major chord.
- It works particularly well when you don’t want an overly full sound, such as playing with a keyboard or bass player who is already covering the bass notes.
Disadvantages
- Not as full sounding as the next two forms.
- It doesn’t work well with strums that hit the bass note.
- If your pinky isn’t used to working, it may take a little effort to get it to cooperate.
How to play it
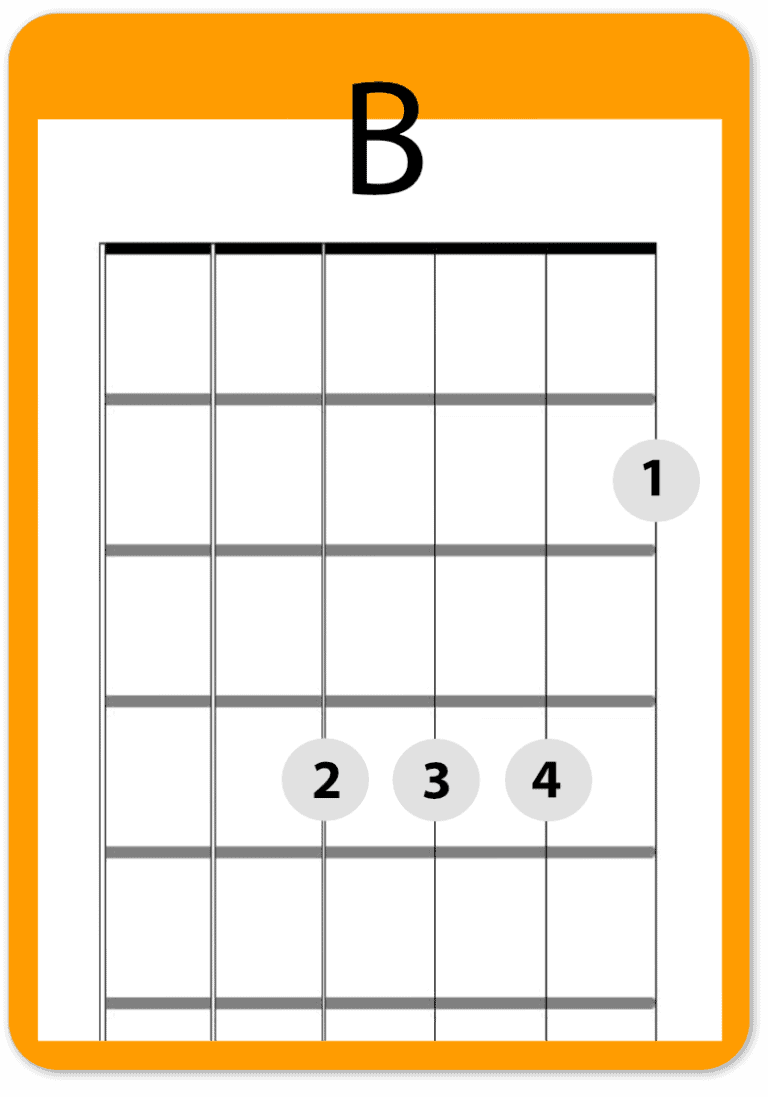
- Put your first finger on the second fret of the first string (the high E).
- Stretch your second finger over to the fourth string, fourth fret.
- Place your third finger on the third string, fourth fret.
- Place your pinky on the second string, fourth fret. (I usually have students put the second, third and pinky down together.)
- Strum the top four strings and check that every note sounds. Skip the fifth and sixth strings.
- Take your fingers off, shake out your hand, and try it again. You did it!
This four-finger version is a great first B chord. You’ll likely want a bar chord version later for more options, and learning this one prepares you for it.
A Fuller Sounding B Chord
Who it’s for
A good version to learn once you’re fairly comfortable with Form #1. It may also be the first version you learn if you already play bar chords. It works particularly well on a nylon-string guitar.
Advantages
- A fuller sound than Form #1.
- If you can play Form #1, the only addition is the bar.
- The bass notes are there for strums that use them.
- It’s movable: slide it up and down the fretboard and you have many other chords.
Disadvantages
- The bar can be difficult.
- On a thin neck (an electric, say) it can be hard to squeeze all the fingers in.
- With more strings covered, there’s more room for muted or buzzing notes.
How to play it
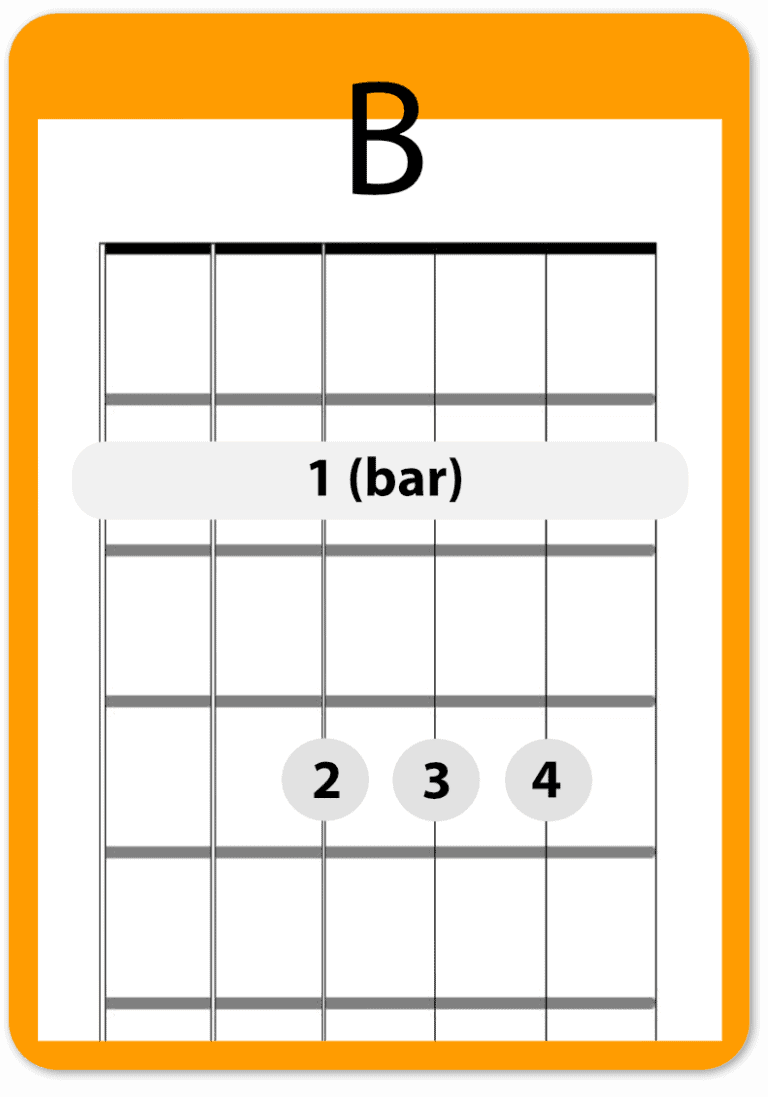
- Start by fingering Form #1.
- Leaving your second, third and fourth fingers where they are, lay your first finger across the second fret to form a bar across the top five strings (or all six, if that’s easier).
- Strum the top five strings and check that every note sounds. Don’t worry about the sixth string for now.
- Take your fingers off, shake out your hand, and try it again.
This version uses the often-dreaded bar, but it has many uses, especially when you want a full chord or a strum that includes the bass note. It’s also movable, so you’re learning many chords at once. Learn Form #1 first; it’s the stepping stone to this one.
Quick B Chord
My go-to
Who it’s for
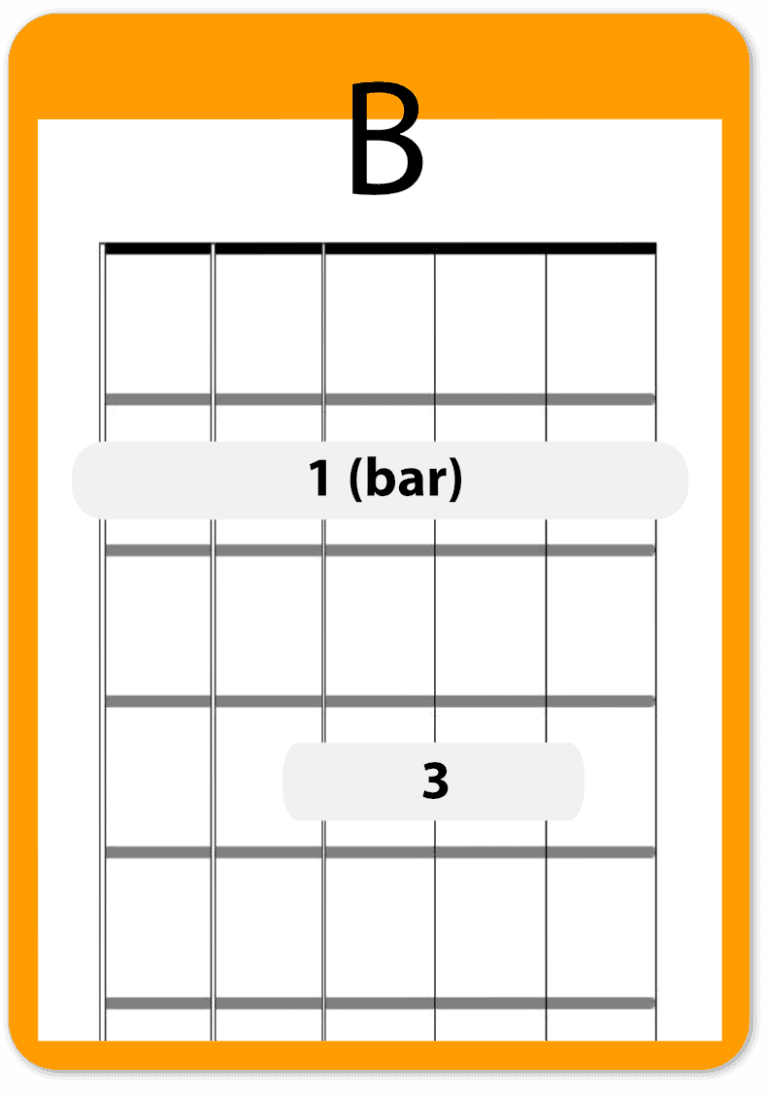
This is the easiest version on an electric guitar, where the neck is thin and the strings are light, and it’s the one I use most of the time on my steel-string too. It may look difficult at first, but once you learn the partial bar, you’ll likely find it the quickest and easiest version to use.
Advantages
- Only two fingers, so it’s quicker to make.
- The easiest version to move up and down the neck for other bar chords.
- It leaves the pinky free for other interesting things.
Disadvantages
- The partial bar takes a while to get the hang of.
- It’s harder on a wide neck, like a classical guitar.
How to play it
- Form a full bar across the second fret. Leave out the sixth string or bar all the way across; either works.
- Use your third finger to form a partial bar across the fourth, third and second strings at the fourth fret (look at the diagram).
- Check that the first knuckle of your third finger is collapsed, with the second knuckle up in the air.
- Keep your thumb behind the neck, with the ball of your thumb resting on it.
- Strum and check that every note sounds. Don’t worry about the sixth string for now.
- Take your fingers off, shake out your hand, and try it again.
Electric players often use this version exclusively, and it’s my go-to on steel-string as well, because it’s the quickest to get to when I’m moving around the neck. The partial bar can take a while, so work at it a little at a time.
| Form | Fingers | Sound | Best for |
|---|---|---|---|
| #1 Barless | 1 on the first string; 2, 3 and 4 at the fourth fret | Lighter, no bass note | Beginners; playing with other musicians |
| #2 Full bar | Form #1 plus a bar at the second fret | Full, with bass | Nylon-string; strums that hit the bass; moving to other chords |
| #3 Quick | A bar at the second fret plus a partial bar with finger 3 | Full, with bass | Electric and steel-string; fast changes |
Two More Ways to Get a B Sound
These two shapes come from another B chord lesson of mine. Neither one needs a bar, and both are movable, so they’re good to have under your fingers alongside the three forms above.

Barless B With the Bass Note
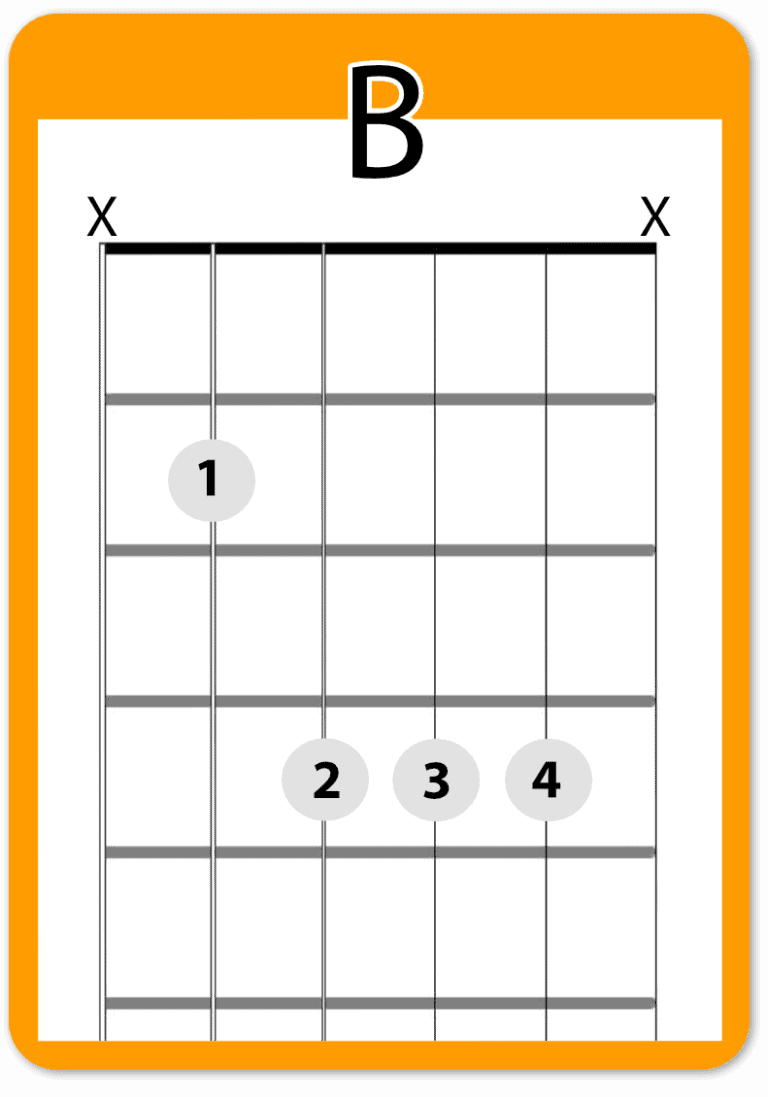
This is Form #1 with your first finger moved from the first string down to the fifth string, second fret. That note is a B, so this shape has the bass note Form #1 is missing, and still no bar.
How to play it
- Put your first finger on the fifth string, second fret.
- Put your second, third and fourth fingers on the fourth fret of the fourth, third and second strings.
- Let your first finger lean lightly against the sixth string to mute it.
- Your pinky tends to touch the first string anyway. Let it rest there to mute that string.
- Strum and check that the fifth through second strings all sound.
It’s a movable chord: whatever note your first finger lands on is the name of the chord. Move it up one fret and you have a C chord; up three frets, a D. It’s also a solid step on the way to bar chords, since adding a bar turns it into Form #2.
B Power Chord
Fewest fingers
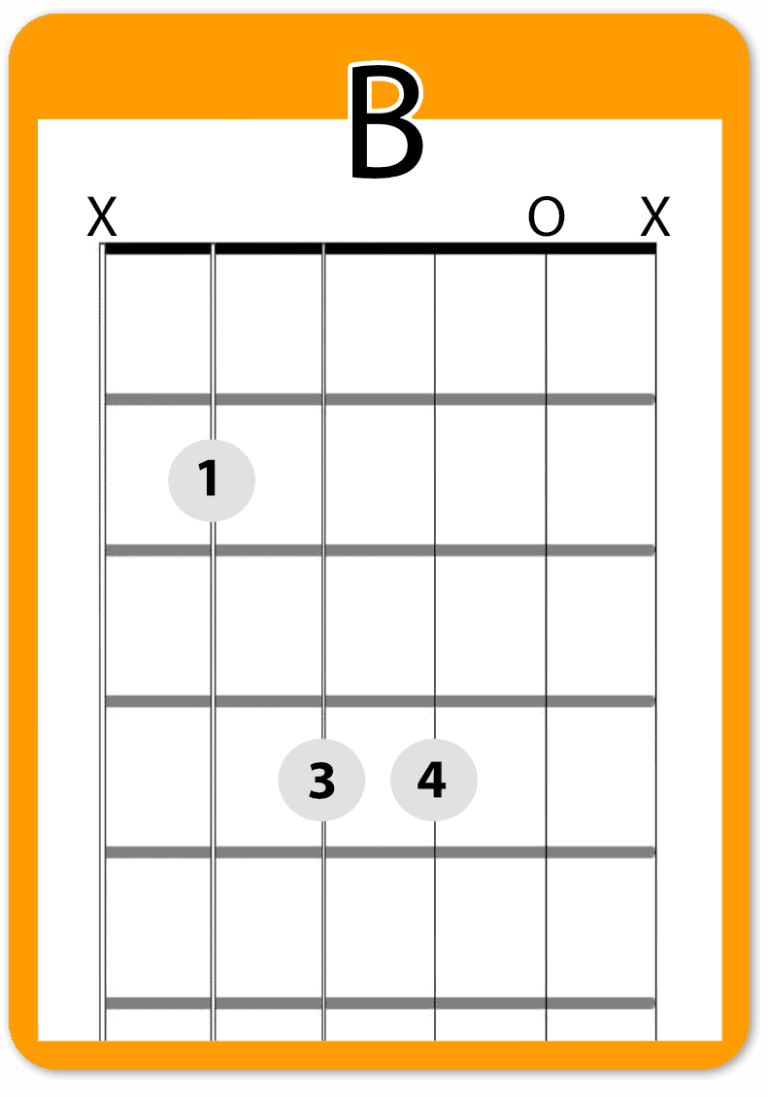
Put your first finger on the fifth string, second fret, and your third and fourth fingers on the fourth fret of the fourth and third strings. This is called a power chord.
Mute the sixth string by lightly touching it with your first finger, the same as in Shortcut #1. The open second string is a B, so it can ring. The first string is harder to keep quiet. If it rings, its E turns the chord into a B add 11: not quite a B major, but a useful sound. If you just want the power chord, aim your strum at the middle strings.
A power chord has no third in the chord, the note that makes a chord major or minor, so your ear fills that in from the song around it. It’s a B power chord, and it’s movable too.
How To Practice the B Chord (Any Form)
- Pick one B chord form to work on. Just one.
- Slowly finger the chord, then take all your fingers off and start over. Do this a dozen times or more. If your hand gets tense, shake it out and relax.
- Now practice moving to another chord. I recommend starting with A major: strum four times straight down on B (save fancier strums for later), then four times on A.
- Keep a slow, steady pulse. Tap your foot, bob your head, or just feel it. Practice changing without slowing down or pausing.
- When that goes fairly well, try it with a metronome at a slow tempo.
- Finally, add a third chord and repeat the process. Little by little, pick up the tempo and practice changing more quickly.
Where To Go From Here
“Begin at the beginning,” the King said, very gravely, “and go on till you come to the end: then stop.”
Alice in Wonderland
Part of learning any new chord is to start small and keep building on what you can do. I’ve seen many students jump to the hardest form, get frustrated, and stop trying altogether. You’re not one of those. Start from where you are. If that’s the simplest form, so be it, and work at it a little each day, even just five minutes.
Here’s how five minutes goes:
- Practice fingering the chord, taking your fingers off, putting them back, and listening to how it sounds. Twenty repetitions, three times a day: about three minutes in all.
- With the two minutes left, practice changing from B to A. Go slow, but be persistent, and keep a good steady pulse.
- Then try it with a metronome, and see how long you can go before you fall off the groove. Stop when you get frustrated and come back later.
- When you’re ready, play your budding B chord in a simple song. Start with three chords.
Follow that, and you’ll start to feel confident with the first form you chose. When you feel ready, there are two ways to go, and you can do both:
- Try the next form up. Go through the same process until you can change between B and one other chord, then use it in a simple song.
- Use the simpler form in more complex songs. Work at changing faster, and use it in songs with more chords.
The point is to keep finding ways to use the chord, so you get quicker with the fingering and smoother at changing. I’d love to hear how it’s going. Let me know in the comments below.
Want more lessons like this one? Try Real Guitar Success free for 14 days.
can you send a chord book to me via email
Hi Roger,
I do not send chord books by email.
THIS HELPED ME SO MUCH!! Ive wanted to be able to play a b for years!!!
I’m glad to hear that Karleigh. – Tomas
Your lesson was quite awesome ! I’m just a beginner and I’ve been able to learn the basics from your site , very well. 🙂
Glad I could help Alan. – Tomas
It helped me . Thanks a lot
Glad to hear that Rudro. – Tomas
Thanks…thanks lot…
You’re welcome Sanjee. – Tomas
THANK. YOU.
My wrist has been hurting SO MUCH trying to fit three fingers in one bar and then cover an entire bar somewhere else with just one finger. THANK YOU FOR FORM 3. My 3rd finger feels like a contortionist but the sound is so much better and my wrist doesn’t hurt anymore
You’re very welcome Leo. I’m happy you found this lesson useful. -Tomas
Thanks Tomas, you’ve explained and demonstrated this really well. I’m a beginner and you have made this chord possible. Now to practice. Happy day to you.
Thanks Maggie. – Tomas
Helped me big time, was struggling with the B cord for 3 days in a row until I came across this site. Thankyou
You’re welcome Liz. Glad I could help.
Can’t wait to give this a shot. I thought I was the only rookie struggling with the b chord. I have a feeling I’ll be looking up your lessons often to help tweak my progress.
You are definitely not the only one. Thanks for commenting. -Tomas
Sir, I can play 1st form very easily. But cannot play 2nd and third form. In the 3rd form I feel like my 3rd finger is going to break. I feel that 2nd and 3rd form sound better than the first one since the bass string is also involved. What can I do to play the 2nd and 3rd form with ease.
Thank You.
Hi Yashwant. You can break down the bar chord form and learn it step by step. Here’s some help with that: https://tomasmichaud.com/heres-secret-learning-bar-chords-sunday-update-30/
Tomas
Thank you so much for taking the time to post these awesome tutorials and tips!!!! It’s amazing….I pray extra blessings on your life, because you give the advise that you know to others who need it. I’m enjoying your YouTube videos, which lead me to your webpage and also your Facebook link. I’m so excited that I found your information. I’m taking notes and I know your help will benefit my playing. Keep up the selfless attitude in helping others. Smiles to you!!
Thank you Connie for your kind words. – Tomas
When i play B it sounds false..doesnt seem to fit in with the rest of the chords like E..
Great… I have a lot of difficulty with it, and so many good songs that have B in it.
Thanks so much for showing different B’s,it was SO helpful, yeah,I Can do it ?
Great lesson. I am strongly considering buying your course after one page visit (and Youtube subscribe). Can you guarantee you address every difficulty a normal player will have? I am aware from recent days there are other chords that are also difficult enough (Bm comes to mind) to need individual attention? Thank you.
Thanks so much for all you do. I just played my first open Mic at age 74.
Go Bill 🙂