

Song lessons
The verse and chorus of I Can See Clearly Now use four open chords, D, G, A and C, and the bridge adds an F. Once you have those, you can add a rake and palm mutes to the strum, and try the barre-chord interlude when you’re ready.
Johnny Nash wrote and first recorded this song, and many artists have covered it since, Jimmy Cliff most notably. His version is where I got my inspiration. We’ll play it in the original key. I sing it an octave lower and add a capo to bring it up a little for my voice, but I take the capo off for the lesson.

The Chords
The verse uses three chords: D, G and A. Use any form of G and A you like. I play a two-finger A. The chorus adds C, which takes the song out of the key of D for a moment before it comes right back.
The bridge adds F. I play a barre F, but if you’re not there yet, a no-barre F works well. Make a C chord, put your pinky next to your ring finger on the fourth string, third fret, and move your middle finger over to the third string, second fret. Keep the high E string quiet, either by muting it or with a small partial barre. It’s the same shape as my no-barre F chord lesson. I show it at 4:13.
Map the Verse and Chorus
Start with one strum per bar, so you can hear where each chord falls with the words. Each chord lasts one bar of four beats. I map it out at 1:55, then we play it together at 3:03.
- D, G, D, D, D, G, A, A
- D, G, D, D, C, G, D, D
- C, G, D
I think of that whole section as one verse-and-chorus package. The second package is the same, and then the song goes into the bridge.
The Bridge
The bridge chords are F, F, C, C, F, F, A, A. When you practice it, start from the D at the end of the chorus, so you hear the change to F. We play through the bridge at 4:47.
For the easier version, go straight from that A back into the verse. The longer version adds an interlude here, which I cover at the end.
The Strum, in Three Stages
You can use any of these three stages as your strum, and mix them through the song for variety. The strum starts at 6:18.
Stage 1: Down-Up
Down, down-up, down-up, down-up, counted 1, 2 and, 3 and, 4 and. This one works for the whole song on its own.
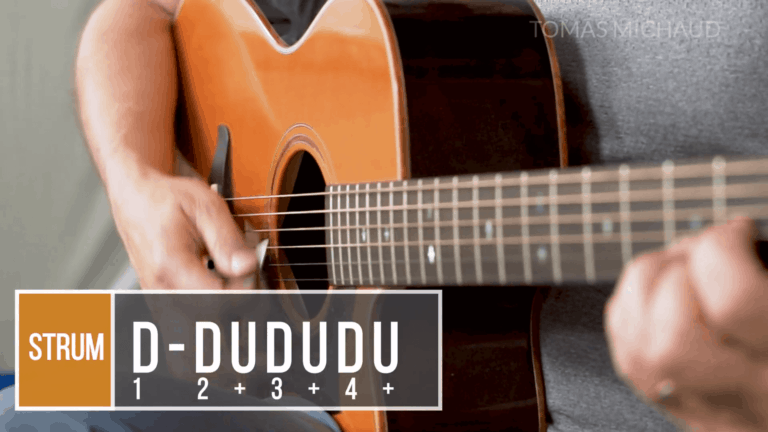
Stage 2: Add a Rake on Beat 2
A rake crosses the strings more slowly, so you hear the strings one after another. Start it a touch early so you reach the bottom right on beat 2, with time to come back up. The rake is at 6:52.
Stage 3: Add Palm Mutes on 3 and 4
For a mute, rest the side of your strumming hand on the strings near the bridge at the same moment the pick strikes down. The full pattern is down, rake-up, mute-up, mute-up. You can also use just one mute: down, rake-up, mute-up, down-up. The mute is at 8:23, and we play the verse with the full strum at 10:20.
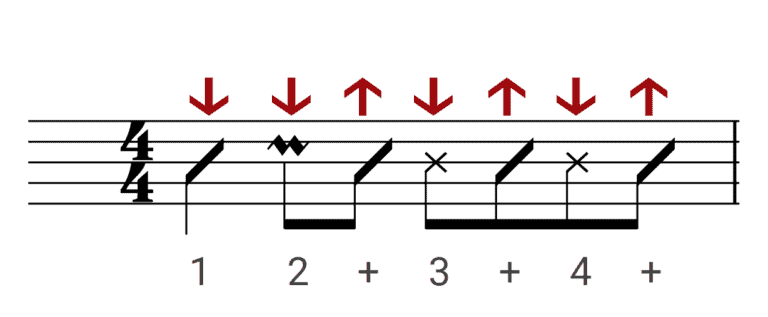
This is the same pattern as my island strum lesson, which takes it step by step.
The Interlude (Longer Version)
The longer version adds an interlude after the A at the end of the bridge, then goes back into the verse on D. The chords are A, C#m, G, C#m, G, C, D6 and A. It starts at 13:11.
- C#m: a barre on the fourth fret, with the root on the fifth string. Index finger across the fourth fret, middle finger on the second string, fifth fret, and ring finger and pinky side by side on the sixth fret of the fourth and third strings.
- G: slide down a fret and change to a barre G on the third fret, with the root on the sixth string (the E shape). I use a barre G here instead of an open G, because it’s easier to move between two barre chords than to jump between a barre chord and an open one.
- D6: play a D chord and lift your ring finger, so the open B string rings.
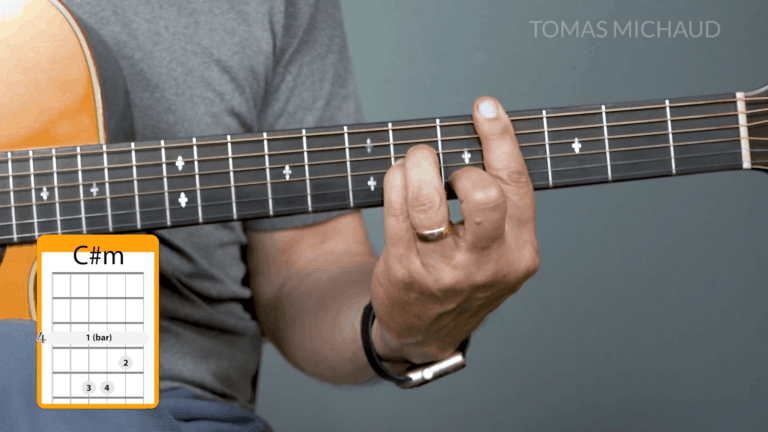
I show the fingerings at 14:46. If barre chords are new to you, my barre chords guide is a good place to start.
Take the Version That Suits You
The open-chord version with the first strum is a whole song in itself. When you’re ready, add the rake and mutes, and save the interlude for when you want to work on barre chords.
Want more lessons like this one? Try Real Guitar Success free for 14 days.